Showing posts with label CRAFTS. Show all posts

Miniature Collectables: Fully Furnished Mini Homes


Antique English Dollhouse

What Miniature Dollhouses Represent


Barbie dollhouses may be the modern version of classic miniature homes, but, traditionally, handcrafted miniatures were not toys that children played with. Miniature homes represented many things to different people. They were: 
  • Moral instruction ‘tools’ for young girls. Dollhouses were used to teach girls domestic and home improvement skills—the things required of them when they got married and had to run their own homes. The handcrafted home interiors had all the imaginable household items needed, like porcelain, napkins, sweepers and dusters, pots and pans, and even things as simple as tea cosies.
  • Priceless collectables. Many upscale dollhouses were owned by wealthy adults who loved, genuinely appreciated, and collected these beautiful, intricate museum-worthy works of art for their own pleasure.
  • Entertainment and conversational pieces. Nobles displayed miniature houses to delight their guests and show off their superb taste in art.
  • Investment opportunities. Some owners amassed their miniature collections, knowing they would eventually become antique keepsakes of extremely high value.
  • Structures of personal fascination. Dollhouses provided an eye into a miniature world of unimaginable and luxurious living. It is so inexplicably satisfying to see familiar things in miniature forms, scales, and sizes.
  • Opportunities for voyeurism. These mini-worlds offered a sense of playing god, with the viewer being the ruler of a tiny yet distinct world filled with little people and things.

In a world where most millennials cannot even think of purchasing real property, it is no real wonder that dollhouses remain, for many of us, a gentle bit of wish fulfilment.

Vintage miniature home kitchen with everything a young girl needs to practice cooking, cleaning, and organising. 


Classic Miniature Home Styles


To enthusiasts and collectors, having a choice of architectural styles is part of the essence of collecting miniature homes. While some collectors only go for closed-crafted miniature houses without a view of the inside, others prefer homes with viewable rooms, where each room is intricately designed with furnishings of different periods. Every detail of the interior is included in the structure, including wallpaper, floor coverings, and tiny light fittings.

Some popular architectural and interior design styles for miniature houses include:
  • Colonial
  • Victorian
  • Art deco
  • Edwardian
  • Mid-century
  • A-frames and cabins

Closed vs. Open Dollhouses


A closed-crafted home only provides an external view. You can't see into any of the rooms. An open home will have viewable rooms.


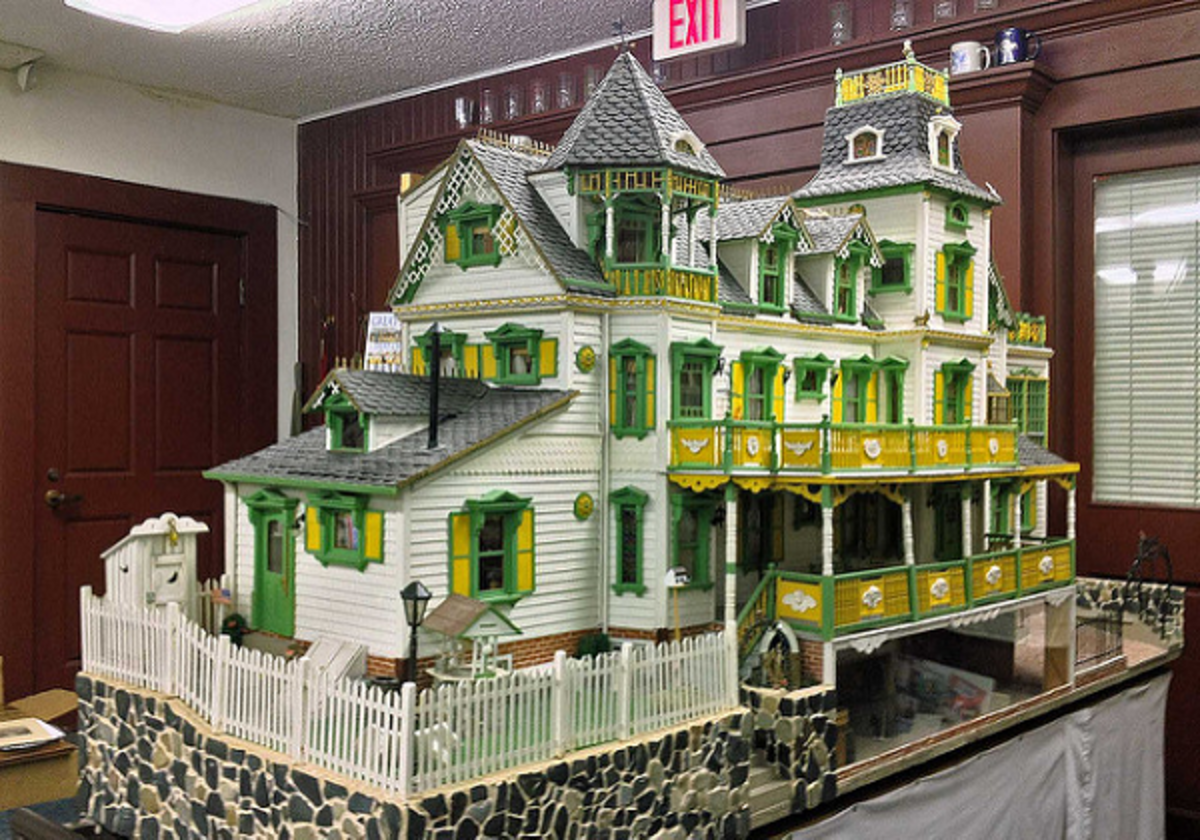
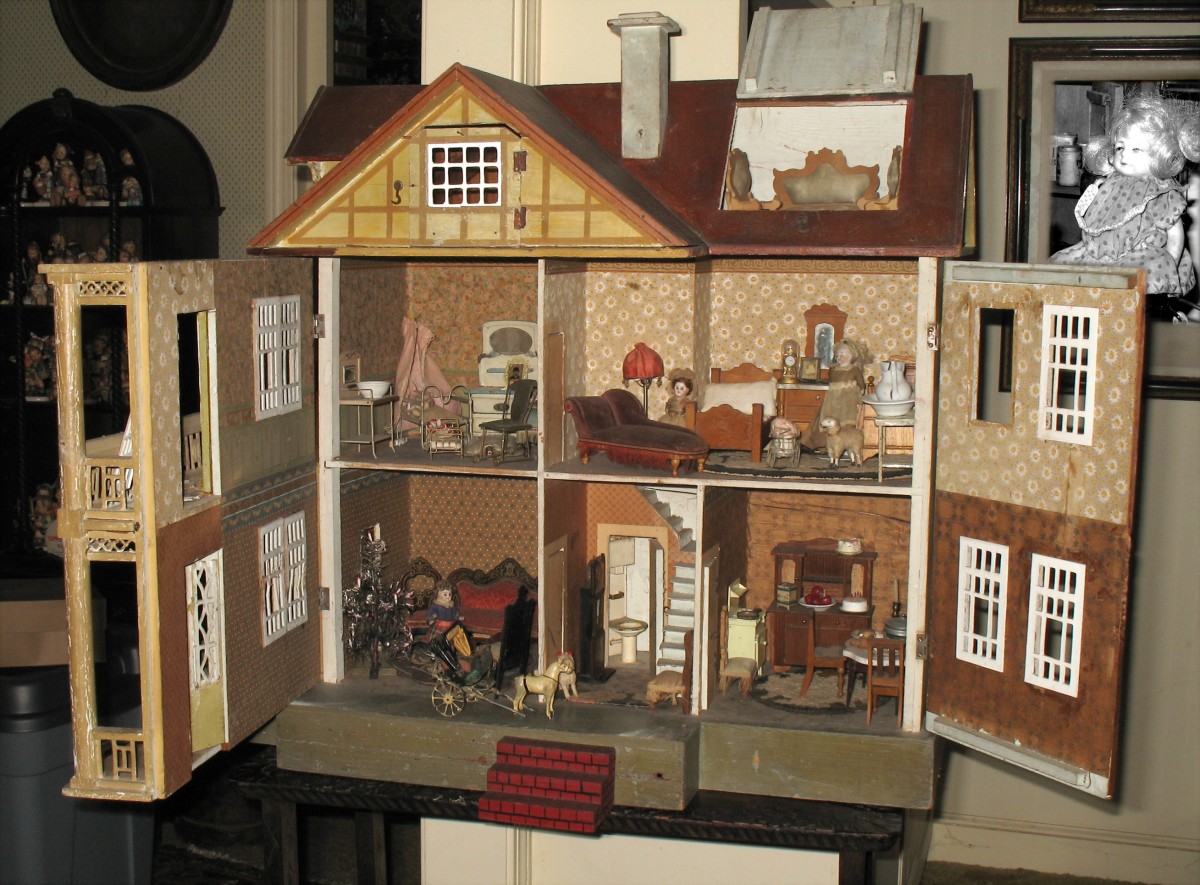
A collector's item: a Victorian-style miniature house with details typical of the 19th-century homes of the wealthy.

Famous Miniature Houses


  • Some notable and priceless miniature houses include:
  • Stettheimer Dollhouse, constructed between 1916 and 1935
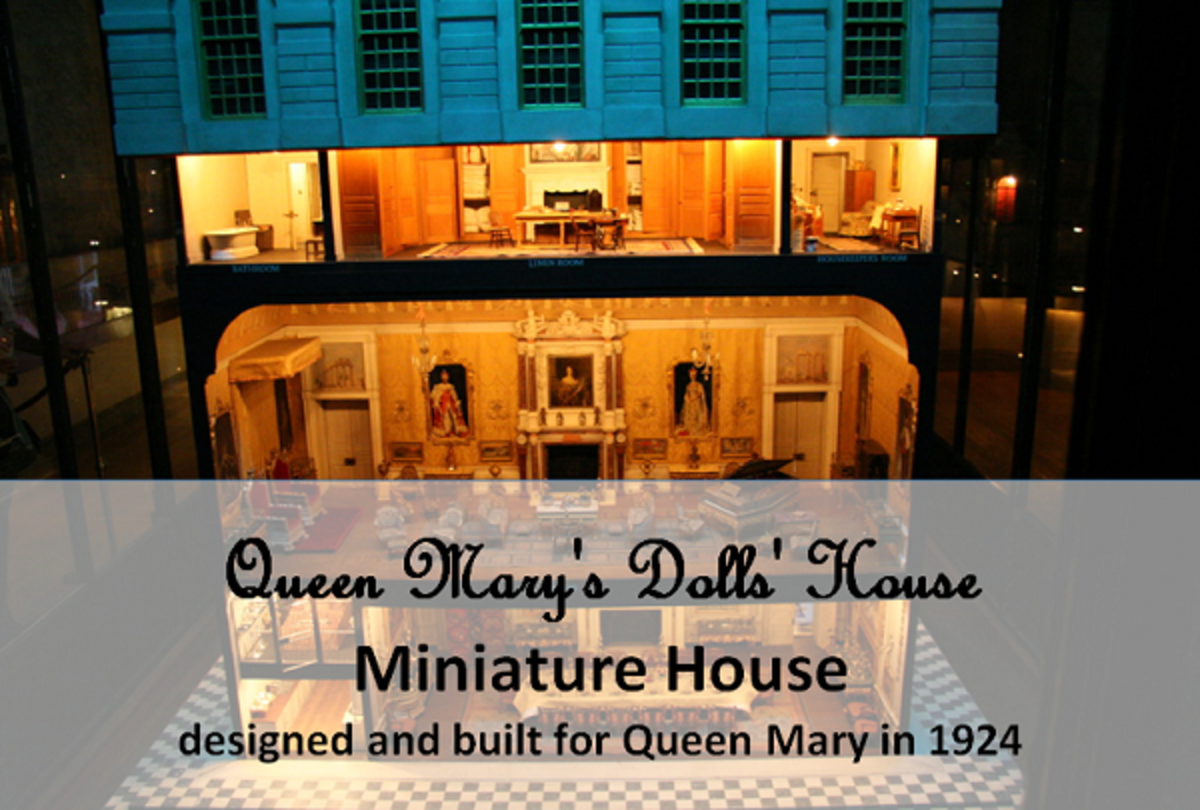
  • Queen Mary's Dolls' House, designed for Queen Mary in 1924
  • Titania's Palace, hand-built by Irish cabinet-makers
  • Tara's Palace, which took ten years to build and consists of 22 rooms

These breathtaking works of handcrafted art are cherished collectors’ items that date back hundreds of years. Today’s enthusiasts and crafters who have invested in these types of collectables can successfully sell these mementoes for great sums of money.

There are dozens of annual miniature trade shows organised by miniature collectables organisations. At these shows, craftspersons, dealers, and collectors display and sell miniatures worthy of becoming priceless and treasured heirlooms.


Mini Furniture and Furnishings


In my opinion, the most attractive miniature homes are the ones that come complete with everything that is required in a household, with or without tiny people. Everything from furniture, furnishings, appliances, fixtures, and vanities to plush sofas and accent chairs must be included in the interior rooms.

Additionally, these houses feature items like chandeliers, refrigerators, kitchen sinks, bathtubs, towels, toilet roll holders, and even bowls of fruit. Many of these elements are even more intricately crafted than the house structure itself.

Furniture Styles


As the types and styles of the dollhouses vary, so do their furniture styles. The entire interior decoration is determined by the building occupants' social stratum, and the pieces are based on their lifestyles: rich and luxurious, middle-class and comfortable, or poor and threadbare.

For instance, a miniature farmhouse will have the barest essentials of country furniture and furnishings, while a sleek modern house may feature streamlined sofas, Le Corbusier chairs, wood panelling, leather loungers, glass tables, wool rugs, and ’expensive’ wall art.

Standalone Furniture Pieces

Some miniature furnishings collectors only collect individual furniture pieces. They use these beautifully crafted pieces to create living areas, dining rooms, bedroom settings, etc. (contemporary or traditional), which they display on coffee tables, wall shelves, and special display stands and units.

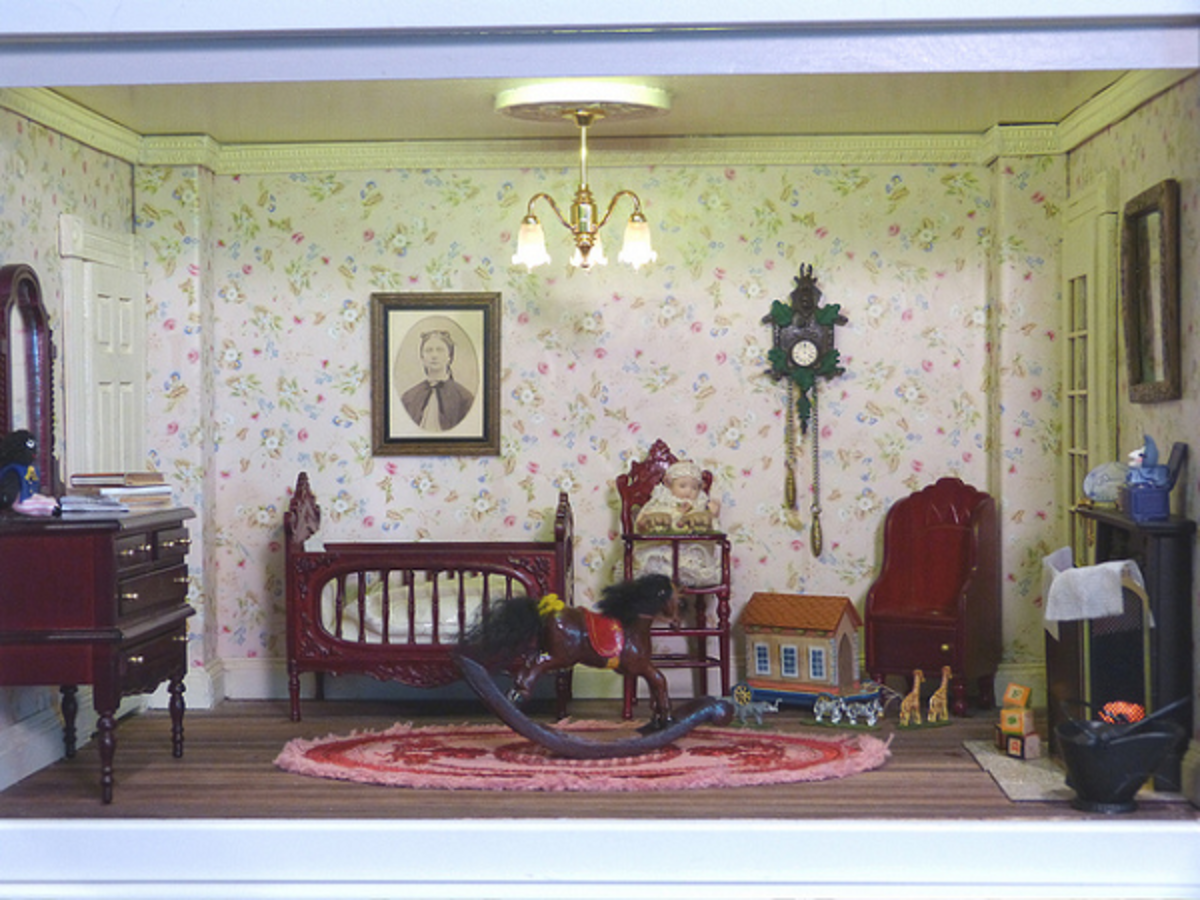
A miniature Victorian-style nursery interior. Notice the furniture, a little baby sitting on a high chair, a crib, and a rocking horse. 


Miniature House or Standalone Rooms?


Not all miniature home collections come as complete residential building structures that comprise external walls, windows, doors, and interior and outdoor rooms. They can also come as single standalone rooms, two-room designs, and storey buildings enclosed with three walls and an exposed front opening to view the interior.

While standalone rooms are easier to build, take less time to craft, and are generally less expensive to make (depending on how simple or complex it is), a miniature house can take many months or even years to build, and it, therefore, comes with an expensive price tag.


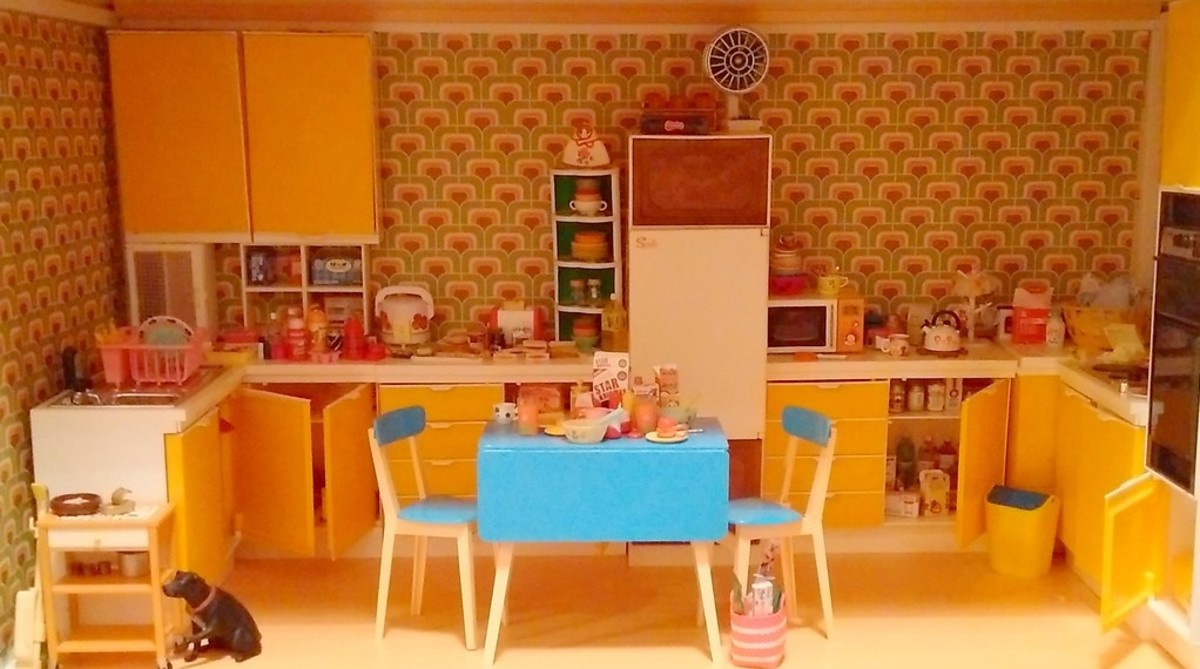
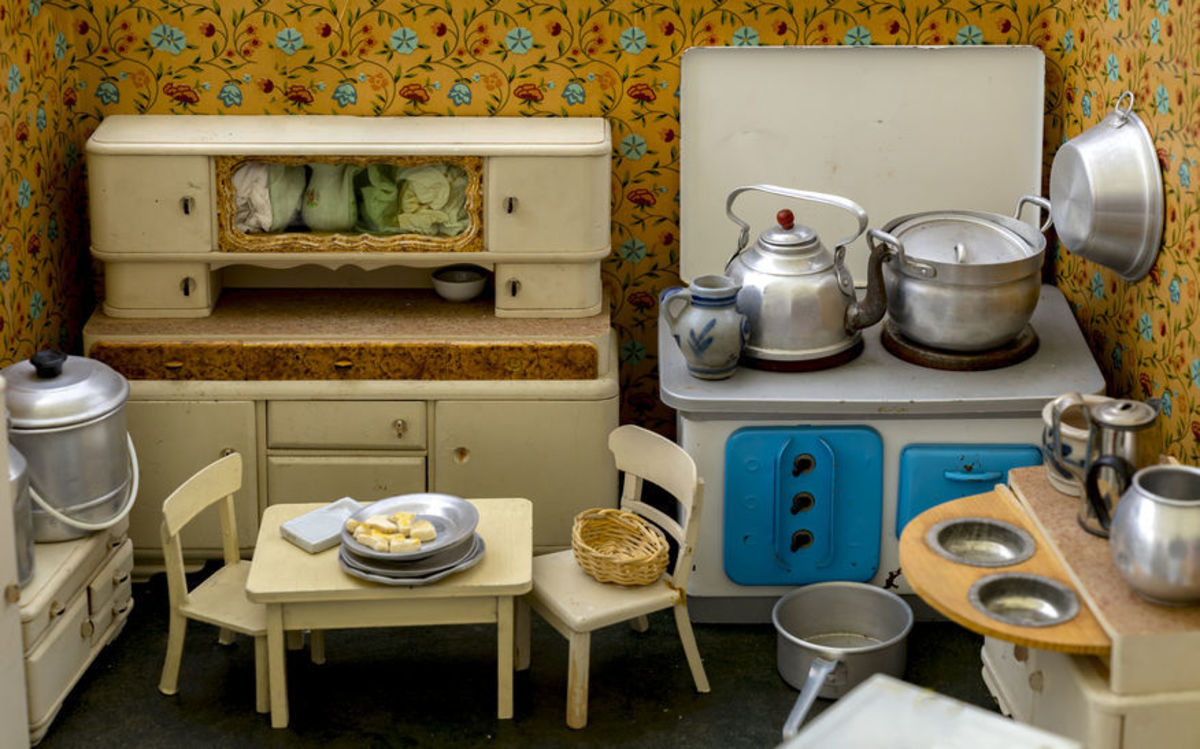
Standalone miniature room: a fully furnished kitchen with mini elements and features.


Modern Dollhouses


Not many modern-day hobbyists like the old ornate classics like the Edwardian, Victorian, and Tudor styles. Many fans will rather opt for modern architectural and interior styles because of their clean lines and sleek minimalist interiors.

Why People Love to Collect Miniatures


Miniatures are intriguing objects; they're beautiful works of art that always tell a unique story. Museums and other exhibitors of miniature objects attest to the fact that these collections are extremely popular among visitors. It is amazing how spellbound viewers appear on seeing this category of miniature art, from the Gothic theme to the Victorian, from the first settlers’ cabin to contemporary models.

If you are a collector or die-hard enthusiast, you will agree that making miniatures is a painstaking hobby that requires creativity, patience, perseverance, and a deft and nimble touch. If you love and admire them, it is because you are in awe of how anyone can craft such minuscule objects and tiny parts.

And because the craft involves making exact prototypes of buildings, humans, interiors, furniture, and furnishings, the craftsman’s pieces must be detailed and crafted to the right scale. They must look realistic enough to be enchanting, captivating, and delightful.


Tips for Beginner Crafters and Collectors


If you want to start collecting miniature dollhouses, you can have them custom-made to your specifications, or you can purchase them from toy shops or speciality stores for miniature collectables online. You will also find them at internet auction sites and online retailers.

To build or gradually collect the pieces for a fully furnished dollhouse, here are some pieces of advice:

  • Start by building a simple, standalone room and furnish it in a way that tells a story.
  • For a traditional style, go for the impressive classics like a Victorian parlour or a farmhouse kitchen.
  • Make your house look live-in by adding occupants (miniature dolls) that will fit in perfectly with your theme. Dress them up appropriately and place them in the room. For instance, add a parlour maid serving tea to the lady of the house.
  • Ensure that your structure is as detailed as possible. Everything within it must have the right scale and proportions.
  • Display your home with ample space around it, preferably in an area set away from the walls. This is to ensure that observers will have a good view of the house from all sides.
  • For individual standalone rooms, a smaller display area will suffice. The structure can be set against a wall or on a shelf as it only needs to be viewed from the front.

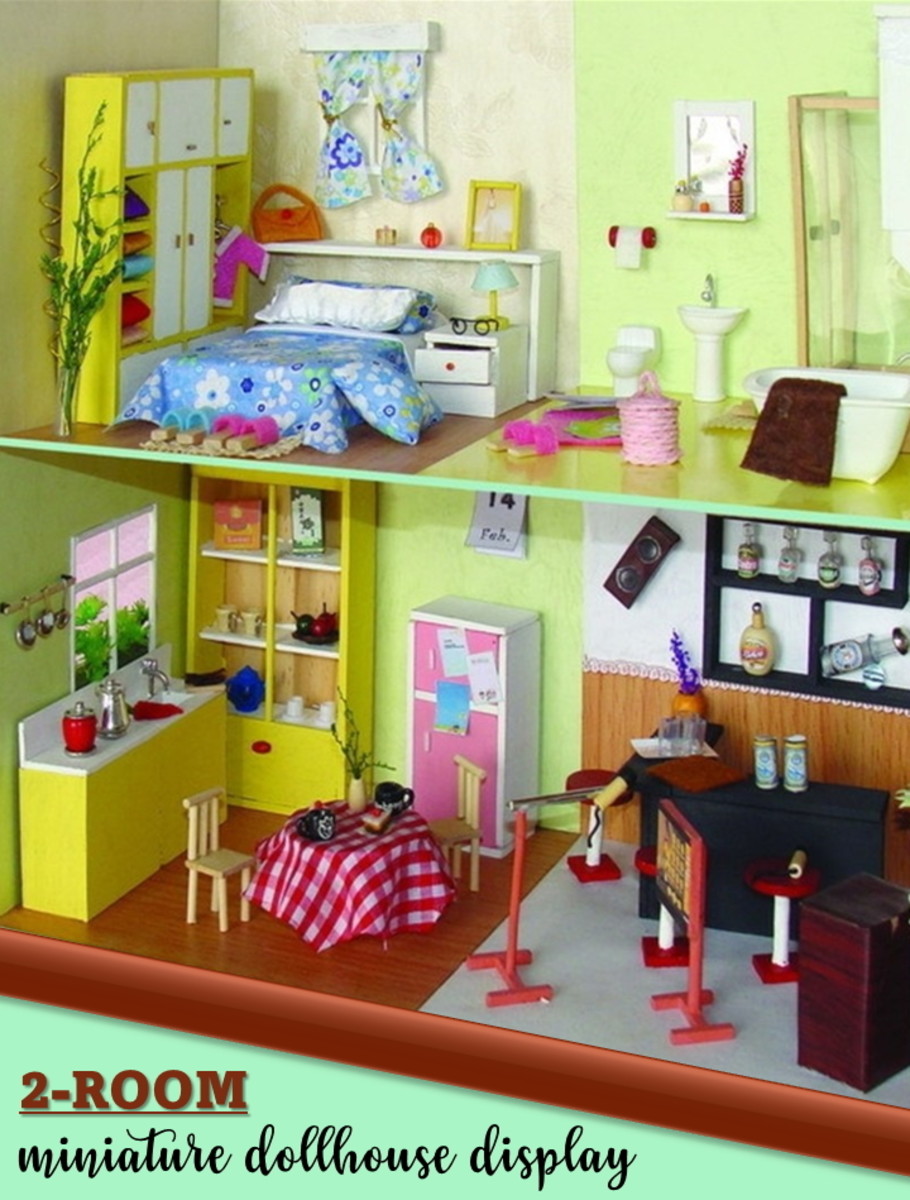
A two-room miniature house with simple furniture and furnishings. A beginner miniatures crafter can start off with projects as simple as a 1 or 2-room space to gain the required skills.


Start Simple


Crafting miniature pieces is not easy. It is a craft that will test your patience, so if you do not wish to encumber yourself with an overly challenging task, start simple.

You do not have to be a skilled craftsman, though. There are miniature home kits that you can purchase if you are not a collector but wish to build. Also, an increasing number of miniature manufacturers are producing tiny dollhouses, furniture, and furnishings for people who wish to create fantasy homes.


(Article originally published by the author on hubpages.com on 02/24/10)


Articles of Interest

How to Make Rag Doll Toys

Making rag doll toys is easy and fun. One need not be creative or talented to create raggedy dolls. And they make wonderful toys for children because they are soft, cuddly, and washable.

Rag doll toys, also known as raggedy dolls, are soft toys made from cloth fashioned into dolls. Hundreds of years ago, and even till today, these soft toys were created at home as crafts, and were made from discarded, worn, or spare pieces of materials, and were stuffed with the same.

Ragdolls are one of the most ancient children's toys ever crafted, and relics of it have been found in a child's grave dating as far back as 300 BC.


It is easy to make a rag doll. It is a fun craft that both children and adults love, and because they can be made in all shapes, sizes, configurations, and colours, you don’t need to be creative, skilled, or talented to make a great raggedy doll.

Characters to use abound, even in our subconscious minds. We can always imagine what character and features our rag doll will have. Long skinny arms and legs, a fat or skinny torso, a huge oversized head, stumpy arms and legs, or a simple yet proportionately shaped doll. If you can imagine it, you can make it.

Ideas for rag doll toys can also be found in children's books, comics, and on the internet. There are also free doll patterns and templates that you can download online.

They make wonderful soft toys for children because they are flexible, warm, and cuddly, but because they are soft toys that can harbour bacteria, as long as the right fabric scraps are used, they are washable.


How to Make a Rag Doll


Before you begin your craft, you must decide on what type you want, its body shape, and whether you want to make a large, small, or miniature doll. Once you have decided on that, you want to choose the appropriate fabric colours to suit your choice.

For instance, for different skin colours, you want to choose colours like cream, brown, tan, sand, or pink. For the extremes, you can go for black or white. The rag doll’s body must be a solid colour, without a pattern or any particular texture.

Materials required

You don’t need to buy new fabrics to make a rag doll, but you can if you wish, as long as what you purchase are fabric remnants, in which case, you may not need to spend more than a couple of dollars. If you intend to use old materials around the house, instead of discarding them, recycle them and make them into soft dolls. Ensure that you wash and iron them before cutting them into pattern pieces. It is best to use cotton. Do not use stretch materials either.
  • Scraps of cloth or old pillowcases, bed sheets, clothing, or curtains
  • Needle and thread
  • Tailor’s chalk
  • Polyester filling or soft fabric scraps
  • Buttons (for the doll’s eyes)
  • Paint Pens
  • Elastic
  • Fabric glue

Tools Required

  • A pair of scissors
  • Pins
  • Safety Pins
  • Sewing Machine

A rag doll toy can be any shape, size, type or configuration that you desire. There is no hard and fast rule as to how one should look.


The doll’s head and body patterns are easy to make with a sketch and simple measurements if you decide to DIY. First, practice sketching its outline on paper until you get it right. The head’s shape can be round or oval. The torso is easy. All that is required is to again, practice with a sketch on paper. The shape can be square or rectangular, but it is best to keep the torso rectangular.

The arms and legs are even easier to shape out. For the simplest-to-make rag doll toys, just sketch, again on paper, four cylindrical shapes, two longer (legs) than the others (arms). Try to make all the parts as proportionate to each, as possible, but there is no hard and fast rule about that.

If you find this too time-consuming (it isn’t), you can order rag doll patterns from online art and craft stores.

Once you are satisfied with your patterns, it is time to transfer the shapes onto your cloth by drawing their outlines. Follow these eight guidelines: 
  1. Include a seam allowance of at least 1 inch. It’s important to start off by making rag doll toy shapes a little larger than you want the finished doll to be. There must be ample allowance for stuffing.
  2. Double the material. Remember to keep the right sides of the fabric together and on the inside. Cut out your pattern along the outermost (allowance) line.
  3. Stitch with hand (or sew with a sewing machine) the outline, but leave an opening where you will pass the filling through.
  4. Relieve the seams around all curves and corners by cutting triangular notches in the seam allowance. You will find these in the arm joints, between the legs, the corner of the neck and shoulders, and the head.
  5. Turn the doll inside out.
  6. Start to stuff with polyester filling (recommended) or scrap soft cotton fabrics. Make sure you fill it until it feels very firm to the touch.
  7. Stitch to close the stuffing opening by turning the edges towards the inside and then stitching it closed by hand or with a sewing machine.
  8. To form flexible limbs, stitch straight across the arms at the shoulder points and the legs at the hip points. This allows the rag doll to swing its arms and legs with ease. It will also make it comfier and warmer to hug and hold.

A ragdoll pattern showing the different body parts. 


The Exciting Part of Rag Doll Making


Decorating these cloth dolls is one of the really exciting and fun parts of making rag dolls.

The face – Use bold buttons for the eyes, and glue or stitch them into position. Use a different button for the doll's nose. You will find millions of buttons appropriate for these. You can also paint on the eyes and the nose. Alternatively, if you are good at embroidery, you can embroider the eyes and the nose. For the doll’s mouth, use felt material cut out in the shape of lips.

Clothing - You can sew plain, pretty, or chic clothes for a rag doll using leftover or recycled textile materials. If you can't find old clothes to recycle or the ones available don’t look cheery enough to make and dress up the rag dolls, you can source fabrics to use in other ways. Ask friends or family, you never know, they may have what you need, and even decide to join in the fun of rag doll making.

HairAttaching rag dolls’ hair can be a bit of a challenge, but it is not as hard as you may believe. Materials to use for hair include knitting wool, yarn, or thin strips of fabric. Choose whichever hairdo you desire for your doll: hair, Goldilocks waist-length hair, crazy Afro hairdos, crimped, cropped, kinky, twisted, or plaited. Your new ragdoll needs to have a personality, and what better way to achieve this than with its hairstyle?

FootwearChoose a colour to complement the dress. You can use felt or textured material for ragdoll shoes. They are easy to make and can be made to be fixed or removable.

(Article originally published by the author as Great Gifts for the Orphanage: Rag Doll Toys at hubpages.com on 11/20/09)

Articles of interest

6 Must-Have Hand Tools to Craft Dollhouse Furniture

Miniature furniture tools are specialized hand tools that are required to make miniature dollhouses and dollhouse furniture. For miniatures enthusiasts who wish to develop or expand their miniature woodworking skills, owning a set or kit of mini tools is a necessary investment because standard woodworking hand tools are too large to create intricate objects and details required for carving mini furniture and furnishings.

Miniature dollhouse furniture with Country house-style furniture and furnishings.

For miniature furniture makers, the crafting of tiny pieces of home décor items is the core of the beautiful craft of miniatures but without the appropriate tools, it can become a challenging and testing task which may rob the enthusiast of the satisfying accomplishment of building miniatures collectables.

To create a beautiful dollhouse as a stand-alone collectable displayed on a table shelf may be an end in itself, but for those who love to build miniature houses, building the house is not enough. A dollhouse will never look complete without furniture.

A miniature house is a mini version of a real home and must be complete with tables, chairs, sofas, stools, coffee tables, desks, tallboys, armoires, chests, cabinets, bed sets, dining sets, and the lot.

Aside from furniture, the house requires furnishings and fixtures like table lamps, chandeliers, sconces, appliances, and window blinds and drapery, throw pillows, bedcovers, linen, and decorations. To a maker and collector, an unfurnished dollhouse is an unfinished project.

From elegant traditional miniature dollhouses to mid-century and modern tiny dollhouses, some miniature furniture tools and a few guiding steps are all that are required to start to build your own home miniatures. The following 8 steps explain simply the process involved if you plan to DIY.
  1. Draw out patterns for the miniature furniture. You can also purchase patterns for miniature furniture online, or at some local craft shops.
  2. Purchase softwood that is easy to cut and manipulate.
  3. Lightly glue all pattern parts to the softwood.
  4. With a mini hand saw, cut around the pattern borders to get the individual parts.
  5. With a furniture adhesive, glue all the tiny parts together to form the furniture piece.
  6. File all sawed edges lightly and sand the assembled piece of furniture.
  7. Use a wood filler then re-sand with smooth grade sandpaper.
  8. Paint, stain, or lacquer the finished object.

Must-Have Miniature Furniture-Making Tools


You will need an assortment of basic mini-hand tools and a couple of essential power tools. For instance, if you need to fasten or solder wires together, you need a small soldering set, and if you wish to create an intricately carved headboard, you will need a pair of needle-nosed pliers (or wire-bending pliers) to get the job done easier and faster.

A mini-size basic tool kit is essential to carry out the task of miniature furniture making, but if you would rather buy each tool individually, to do any serious work, you must have these basic essentials listed in order of importance, as follows:
  • Jigsaw
  • Power hand drill
  • Lathe
  • Circular saw
  • Pin vice
  • Mitre box


Mini Jigsaw

The mini jigsaw is the most important miniature furniture tool that is required, and without one, it is virtually impossible to make intricate cuts. A handsaw will not do the job to your satisfaction and trying to mitre the ends will become a stressful task. Moreover, as you progress with the work, other more difficult and detailed operations would surface and only a mini jigsaw can cut the tiniest pieces. Choose a jigsaw with a rotating electric motor. This will reduce unnecessary vibrations that will occur if you use a vibrating electric motored jigsaw.

Miniature Power Drill

The miniature power drill is the second most important tool required for miniature furniture making. It helps speed up the work while ensuring accuracy. Choose a power drill that has a variable speed because it broadens the drill's usefulness. A must-have attachment is a drill stand which allows the hand drill to be used as a drill press. This enables holding the drill down at any angle, giving the craftsman free hands to work with. Other attachments may seem tempting to buy, but the drill stand and a router attachment will suffice, especially if you are a beginner crafter.

Mini Lathe

The lathe is the third most essential tool required for miniature furniture making. If you intend to make period-style furniture with turned legs, posts, etc., this tool must be part of your collection of tools. However, if you plan to make only simple basic furniture - square shapes and simple parts, then you probably don’t necessarily have to buy it.

Some skilful miniature furniture makers can carve curvilinear and other intricate pieces by hand, but if you are not yet skilled in the craft, doing it will waste a considerable amount of your time. You definitely need a lathe.

One with moderately fast speed will do for all the required wood works while a slower speed lathe is great for any form of metal works that may be needed for the task of miniature furniture making.

Mini Circular Saw

Today, you will find miniature circular saws that enable a miniature furniture craftsman to cut perfectly straight wood, even up to about a quarter of an inch in thickness (8mm). Some mini circular saws come as attachments to a lathe. It is best to choose a circular saw that works with an adjustable blade angle of 45 degrees. With this type, you can make perfect mitre cuts which allow for the beveling of wood edges.

Pin Vice

This is an inexpensive hole-drilling tool and another must-have mini furniture tool. It is handy when you have intricate works that require precision and accuracy. For example, if two holes at the ends of very narrow dowels must meet accurately, a pin vice will help you do this effortlessly. This tool is good for fitting into hard-to-reach places that the electric hand drill may not reach, and so, is a valuable addition to the larger hand drill.

Mitre Box

Just as a pin vice can drill tiny holes more easily and accurately than a hand drill, so will a mitre box mitre a wood end more easily than the jigsaw. This mini tool can cut wood pieces at a variety of angles, though it is only useful for very small pieces that the jigsaw is too large to handle. The jigsaw only handles larger pieces of furniture parts.

For instance, when you build miniature picture frames, the mitre box will cut mitres for the frame (imagine how tiny these can be), as well as small items like door and window frames, picture mouldings, cornices, trims, and baseboards.

Though owning this tool is not a requirement for making miniature furniture, a craftsman will find that working without this tool will make the task slow, and will likely cause inaccuracies.

Other Tools You May Require


Some other tools you may like to have included in your collection are:
  • Miniature files
  • Piercing saw
  • Miniature chisels
  • Squares
  • Precision tip glue bottles
  • Craft and carving knives
  • Glueing jigs and clamps


Dollhouse furniture and furnishings, made using basic mini furniture tools.

As you become more skilled, your tool collection will grow just as your enthusiasm will. Granted, there is a vast range of tempting miniature hand tools and equipment that you may wish to buy but it’s good to know that while some will turn out very useful, some will not.

(Article originally published by the author at hubpages.com on 02/26/10)


Articles of interest
Craft-Making: Rag Dolls Hair With Yarn, Rags, or Mohair

How to Make Rag Dolls Hair With Yarn, Rags, or Mohair

Give Your Rag Doll Personality

Making rag doll hair is a fascinating part of the rag doll-making craft. It is also the most rewarding task because it is an opportunity to give handmade dolls a personality, something that can only be achieved through their unique hairdos and clothing.

There are many ways to make hair for rag dolls, but the three most effective materials to use are knitting yarn, fabric strips, and mohair.

From gender-specific haircuts to natural, classic, and trending styles, the hair you create for your rag doll gives it character and helps relay the intended personality.

The is a variety of materials you can use to make rag doll hair, but your choice will always depend on the look you are trying to achieve.

Whether you are making a young doll with short, cropped hair or one that is supposed to be older, you should make sure that your doll's hair matches the character you are creating. For instance, if you are making a Diana Ross doll, you’ll want your doll to have a huge Afro-style. Whereas, if you want a Cinderella doll, your doll must have long silky hair.

Supplies and Materials


Because they are handmade toys, knitting yarn (wool) is probably the best material to use, as it stands the test of time, washes well, and is easy to attach to a doll’s head.

Other popularly used materials for dolls' hair include mohair (a fluffy, lightweight, and luxurious fibre known for its soft sheen), fabric strips (you can cut these from old or ready-to-be-discarded clothing), and synthetic hair weaves (these can be securely stitched onto a doll's crown, but I prefer yarn and fabric for a handmade look).

Before you start to make your rag doll’s hair, you need to gather together all the tools and materials you will require. You will need:
  • A pair of scissors
  • A sewing needle and thread (or a sewing machine)
  • Ragdoll hair material (yarn, rags, or mohair)
  • Scotch tape
  • Measuring tape
  • Crafting needle
  • Tacky glue (if you are using synthetic hair)


Knitting yarn is a great material to use when creating hair for your rag doll.


How to Make Rag Doll Hair With Knitting Yarn


Natural yarn is a fibre commonly made of sheep's wool or angora with plies spun together into thicker strands. The number of plies, single, two, or five, will affect the drape and feel of the rag doll's hair.

For hair, use nothing less than a 6-ply yarn if you want thick-looking hair that falls well. For thinner strands of hair, you can use a skein of 4-ply yarn. I have found that for my work, the best types to use for lush hair are thick yarns. And I love that they come multi-coloured too; the modern rave in hair colours.

Instructions:
  1. Get some yarn, about one skein of 6 ply yarn and cut 30 strips, six inches long.
  2. Separate the ply from each of the 30 pieces.
  3. With a crafting needle, pull the yarn strip through the head of the rag doll, stopping the yarn from pulling out by tying a knot at the end of the yarn strip.
  4. Work the yarn into the whole head, putting the strands closer and closer together.
  5. Continue with this until you have exhausted the yarn you are working with.
  6. If the fullness of the hair is unsatisfactory, cut more yarn and continue to attach as in #4.
  7. Style the doll’s hair any way you wish, or simply tie it with a colourful ribbon into a ponytail.


How to Make Rag Doll Hair With Fabric Strips or Rags


We all have clothes at home that are ready to be discarded, so, what best way to put that old t-shirt or pillowcase to use than to create your rag doll's hair from it?

Hair made from fabric strips must not end up looking clumpy and ‘hard’, so it is best to use softer fabrics like cotton which allows the hair to look and feel soft. Only use plain coloured strips. You don’t want a doll’s head full of patterned hair.

Instructions:
  1. Cut out strips of 1” x 12” lengths from the old cloth.
  2. Lay the first strip across the doll’s head with the ends hanging in the direction of each ear.
  3. Use a regular needle and some thread to stitch the strip on the rag doll’s crown.
  4. Lay a second strip directly next to the first and stitch it down.
  5. Work towards the back of the head and continue to stitch to the scalp until you reach the nape of the neck
  6. Add bangs to the rag doll's forehead with short strips of fabric.
  7. With the two distinct sections of hair forming pigtails, tie each with colourful ribbons.
  8. You can tack the pigtails with the ribbons neatly onto the rag doll's scalp using a needle and thread.

Mohair is another great material you can use to create hair for your rag doll.

How to Make Rag Doll Hair With Mohair


Mohair is known for its luxurious look and feel. Though it is more expensive than yarn and fabric strips, it is very stretchy and springs back to shape instantly.

When washed gently, mohair will resist wrinkling and sagging when dry and because it is so fluffy, it makes great rag doll hair. Mohair must not be used for toys and is only used on rag dolls that serve as decorations or collections.

Instructions:
  1. Buy half an ounce of mohair to do this.
  2. Starting at the back of the hair at the neck, place a small section of mohair, felting it into place using a felting needle. Push the needle in and out of the doll's scalp and the mohair about 20 times (depending on the size of the rag doll’s head).
  3. Moving close to the first section of mohair already attached, add another section, using the same needle motions.
  4. Working from the back all the way to the front, continue adding the mohair till the head is full of hair.
  5. Create a 'parting' using the same felting needle and sew a line from the front to a point that you desire.
  6. You can add a small section of mohair in the front to create a fringe.


Making a rag doll is easy and a whole lot of fun. It is a craft that is enjoyed by both young and old.

If you are a beginner and just need some tutorials or a guide on how to make rag dolls, there are numerous guides online that will teach you how to create unusual dolls with great features. Its step-by-step instructions will guide you through everything, from cutting out the patterns to painting faces, making the hair, and designing the apparel.

Happy Crafting!

(Originally published by the author at hubpages.com on 11/20/09)


Articles of interest

How to Make Homemade Traditional Girl Scout Cookies

The first-ever Girl Scout cookie was the sugar cookie. They were easy to make and required only a few ingredients. Of course, it was over a quarter of a century before I was born, and I only became a member of the Girl Guides half a century later. Nonetheless, it was one of the things we were told about during our camping outings. We were told the reasons why the Girl Scout sugar cookies were baked.


The ingredients used from the beginning were always in the food pantry, like butter, sugar, eggs, flour, milk, etc. Preparation was straightforward, even with tools and methods we may now refer to today as archaic.

A Brief History of Girl Scout Cookies

From inception, cookie sales have helped Scouts develop valuable skills while having immense fun. That their efforts provide needed funds for their local Girl Scouts councils and troops is a thing of pride for the girls that their hard work provides such resources.

Scout cookies are produced and sold only during the Girl Guide cookie-selling season and serve as an all-important part of the leadership experience for young girls. However, you can make your own at home whenever you wish.

Cookie baking and selling activities happen only once a year, with most sales between January and April, but there are a few exceptions when Scout cookies are sold as early as September.

Sugar Cookie Recipe

This is the early 20th-century recipe for the Girl Scout sugar cookies.

Ingredients
1 cup butter
1 cup sugar
2 eggs
2 tablespoons milk
1 teaspoon vanilla
2 cups flour
1 teaspoon salt
2 teaspoons baking soda

Preparation
  1. Cream butter and sugar. Add well-beaten eggs, milk, vanilla, flour, salt and baking powder. Leave mix covered for at least 1 hour.
  2. Roll the dough and cut it into trefoil shapes; sprinkle sugar on top
  3. Bake in an oven (375°) for approximately 8–10 minutes or until the edges begin to brown. Makes six to seven dozen cookies.

Subsequent Cookie Recipes From 1927

Subsequently, selling cookies became a familiar feature of Girl Scouting, especially in Canadian and American culture. And for nearly a century after, Scouts, with the wholehearted support of their families, have in no small measure contributed to the success of the troops' programs and activities.

By the mid-1930s, the organization started retailing commercially baked cookies, with Greater Philadelphia being the first council to do such.

A year later, another large troop, the Girl Scout Federation of Greater New York, raised money by selling commercial cookies. Their trefoil-shaped die had the words "Girl Scouts Cookies" printed on the package. By the early 1950s, the following varieties were produced and sold extensively: 

Sandwich.
Shortbread (Trefoils).
Chocolate Mints (Thin Mints).
Vanilla-based filled cookie.
Chocolate-based filled one.

Of all these five cookie classics, Thin Mints and Trefoils still remain favorites today.

1927 Cookie Recipe

This simple cookie recipe was created by Christina Riespman in 1927 when a company in Saskatchewan needed to raise money for a camping expedition for their troops.

Ingredients
1 cup butter
1 cup sugar
3 eggs
2 tablespoons cream
Pinch salt
1 teaspoon baking soda
2 teaspoons baking powder
1/2 teaspoon ground cardamom (aromatic spice of a tropical plant)
3 (or 4) cups flour to make a soft dough

Preparation
  1. Cream butter and sugar in a bowl. Beat in the eggs and cream.
  2. Mix the salt, baking soda, baking powder, cardamom and flour.
  3. Sift the dry mix into the wet ingredients and mix thoroughly into a dough.
  4. Roll and cut with a small flour-coated glass or cookie cutter.
  5. Sprinkle with sugar and bake at a moderate heat in an oven until done. (Source: Anna Humphrey)

Thin Mint Cookie Recipe (1950s)

This recipe is how thin mint cookies are made, imitating the Girl Scout style. Enjoy this interpretation of the classic Girl Scout Thin Mints. They taste much better after a 24-hour refrigeration. However, you can eat them as soon as they are firm enough.

Ingredients
*For the chocolate wafers:
1 pack of (fudge) cake mix
3 tablespoons of melted shortening
1/2 cup of flour (sifted)
1 egg
3 tablespoons of water
Non-stick cooking spray

*For the chocolate/peppermint coating:
1 (12 ounces) bag of semi-sweet chocolate chips
3/4 teaspoon of peppermint extract
6 tablespoons of shortening

Preparation
  1. Wafers - Mix the wafer ingredients in a bowl and knead on a flour-dusted worktop. Shape the dough into two 1 1/2 inches diameter logs. Wrap logs in plastic wrap or waxed paper and freeze for about two hours or until the dough is firm enough to slice into 1/4-inch thick wafers.
  2. Preheat oven to 375F and place the thinly cut wafers on a lined baking sheet. Bake for 15 minutes until they are firm at the edges. Arrange cookies on a wire rack to cool.
  3. Coating - mix the chocolate chips, peppermint extract, and shortening in a large microwave-safe glass or ceramic bowl. Melt further on 50 per cent power for a minute, bring out to stir gently, then heat for an additional minute and stir again until the chocolate is very smooth.
  4. Use a fork or kitchen tongs to dip each thin wafer in the chocolate/peppermint mix and then place them side-by-side on a wax paper-lined baking sheet.
  5. Refrigerate until firm enough to eat.


Trefoil Recipe

This recipe imitates classic trefoil cookies. Trefoils are the basis for some other Scout cookie recipes such as Tagalongs or Samoas.

Ingredients
1 cup butter
1/2 cup sugar
2 cups all-purpose flour
1/4 teaspoon baking soda
1/2 teaspoon salt
1/2 teaspoon vanilla extract
2 tablespoons milk

It is good to note that using a lightly floured surface on a cookie tray is better than using waxed paper. (This dough mix gets sticky quickly).

Preparation
  1. Cream butter and sugar until it is light and fluffy. Mix the flour, baking powder, and salt in a separate bowl and add the mix to the creamed butter/sugar mix. Add milk and vanilla extract.
  2. Split the dough into halves and refrigerate until the dough is firm. Preheat oven to 350F/180C and line two baking sheets with parchment or silicone liners. Once the dough is firm enough, roll it on a lightly floured work surface.
  3. Going the way the first Girl Guides did it, roll the dough to about an eighth or quarter of an inch thickness, then use a cookie cutter to cut out the shapes you desire.
  4. Bake cookies for 10–12 minutes. Remember to rotate the cookie sheet (180 degrees) halfway through baking to ensure that all trefoil cookies are an even lighter colour.


Modern Innovations: Homemade Cookies with Scout Cookies as Ingredients

For these exciting cookie recipes, use the popular Thin Mints (mint-flavoured chocolate wafers with chocolate coating) or Trefoils (shortbread) Girl Scout cookies as part of the ingredients.

Using Thin Mints
Yield: 6 servings

Ingredients
1/2 box Thin Mints Girl Scout Cookies, crushed
1 pack brownie mix
2 eggs
1/4 cup water
1/2 a cup vegetable oil

Preparation
  1. Crush the Thin Mints into medium size chunks.
  2. Mix all ingredients in a mixing bowl. Do not use an electric mixer or the batter will be stiff.
  3. Spread batter evenly in a greased baking pan (13 x 9 x 2 inches). Bake in the centre of an oven at 350 degrees for 30 to 35 minutes.
  4. Allow cooling before cutting. Serve with mint-flavoured tea.

Using Trefoils (Traditional shortbread cookies shaped like the Girl Scout trefoil insignia.)
Yield: 8 servings

Ingredients
1 box of Trefoils Girl Scout Cookies
Instant cheesecake pudding mix
12 ounces soft cream cheese
Strawberries
Chocolate syrup

Preparation
  1. Crush half a box of Trefoils. Mix softened cream cheese and cheesecake pudding until smooth. Layer crushed cookies and cheesecake pudding in a cup and repeat the layering of ingredients.
  2. Garnish with strawberries (or your favourite berries) and two full Trefoil cookies. Drizzle with chocolate syrup.

See Also:

Must-Have Homemade Chocolate Bars with Cocoa Powder and Coconut Oil

How many of us have had to give up eating chocolates for one reason or another? We are told how bad chocolate is for us because most chocolate is laden with sugar, but not all chocolates are sweet.

Whether you like light milk or dark chocolate, you can make your own healthy batch at home in 30 minutes, including setting time in the fridge. Now that I make my own homemade chocolate bars at home, I try to find ways to make my special treat as healthy and wholesome as possible, and this is where the coconut oil comes in.


Benefits of Coconut Oil

Coconut oil has many health benefits, reasons why it is called a miracle oil, and science has unlocked the secrets to its therapeutic and healing properties. 

If you take coconut oil regularly, you can make healthy snacks and add it to cereals, oatmeal, and smoothies like I do. In fact, you can use coconut oil in more foods than you can ever imagine. It is for those with a sweet tooth who still want something tasty without the unhealthy tag. 

Here, I will describe how I make chocolates with virgin coconut oil. It satisfies my chocolate cravings without making me feel unhealthy. I call them my guilt-free treats.

Guilt-Free Homemade Chocolate Slabs

You can be as creative as you like when you make yours. This means you can add dried fruits and/or nuts of your choice (I love to use raisins, marshmallows, mango, pistachio nuts, and walnuts). You can also add seeds if you wish. For example, pumpkin or sunflower seeds. Remember, these are meant to be healthy chocolate snacks.


Ingredients

  • Pure dark cocoa powder (unsweetened)
  • 1/3 cup virgin cold-pressed coconut oil (must be virgin oil). If it is solid, warm gently to liquify it. My favourite brand ever is the unrefined Viva Organic Extra Virgin Coconut Oil.
  • Sweetener, preferably powdered Stevia (if you have a sweet tooth like me). You can also use maple syrup, agave nectar, or honey.
  • 1/2 teaspoon of any flavouring (vanilla, almond, or mint)
  • Chopped cherries, desiccated coconut, or ginger
  • Chopped nuts
(For hard chocolate slabs, use 1/4 cup of coconut oil)

Preparation Items

  • Mixing bowl
  • Spatula or wooden spoon
  • Ice cube tray, baking tray, or chocolate mould (I use ice cube trays most of the time because I like to pop mine right into my mouth)
Preparation time - 10 minutes

Directions

  1. Mix the cocoa powder, coconut oil, and sweetener in a bowl. Use a wooden spoon. Ensure you mix them thoroughly till all lumps disappear. Mix well until you have a nice smooth paste.
  2. Add your desired flavouring and continue to stir the mix. 
  3. Make a base layer in the ice cube or baking tray with the chopped maraschino cherries, nuts, or whatever you wish. If you use a baking tray, line it with greaseproof paper first.
  4. Pour your coconut oil and cocoa mix over this base layer, 1/2 an inch thick (if you like your chocolate bars thin) and 1 inch if you prefer the thick slabs.
  5. Gently shake the chocolate mould.
  6. Place the tray in the fridge and store it there until it solidifies. This shouldn’t take more than 30 minutes.
If you use an ice tray or thin baking tin, once the chocolate becomes a solid block, you can cut (or break) it into squares while still in the tray. You can use a warm knife if it is difficult to cut through. Keep your healthy chocolate bars in the refrigerator until you are ready to eat them to avoid melting at room temperature.

Enjoy Your Coconut Oil Chocolates

You will love these chocolate treats, not only because they are so delicious, especially if you can get creative with your toppings, but also because they provide a nutritional source of quick energy with great health benefits.


Related Article: